
SDR Transceiver
This project is a HF Software Defined Radio Transceiver operating on the 40m Amateur Radio band. It supports AM, FM, USB, LSB and digital modes, each with selectable bandwidths. It has many features including a squelch control, automatic gain control, automatic notch filter, clarifier control and VOX. It provides a spectrum and waterfall display. It runs on the Raspberry Pi, using Quisk and WSJT-X software.
Parts List:
- Softrock RXTX Ensemble - AU$123 / US$89
- HiFiBerry DAC + ADC Pro (+12mm Stand-offs) - AU$122 / US$100
- 7 inch HDMI Display AU$103 / US$70
- Raspberry Pi 3B+ Computer - AU$60 / US$35
- External Speaker AU$27 / US$30
- RF Power Amplifier AU$25 / US$20
- 32GB Micro SDHC Card - AU$13 / US$10
- Multi-Media Headset (TBD) - AU$9 / US$5
- Low Pass Filter AU$15 /US$11
- Audio Amplifier - AU$4 / US$3
- Real Time Clock - AU$11 / US$8
- 12V-5V DC/DC Converter - AU$5 / US$4
- Enclosure (TBD) - AU$ 100 / US$70
- Heatsink (TBD) AU$20 / US$15
- 12V Fan (TBD) AU$10 / US$7
- Audio Cables/Connectors (TBD) - AU$10 / US$7
Total Price:
- Without enclosure - AU$556 / US$412
- With enclosure - AU$656 / US$482
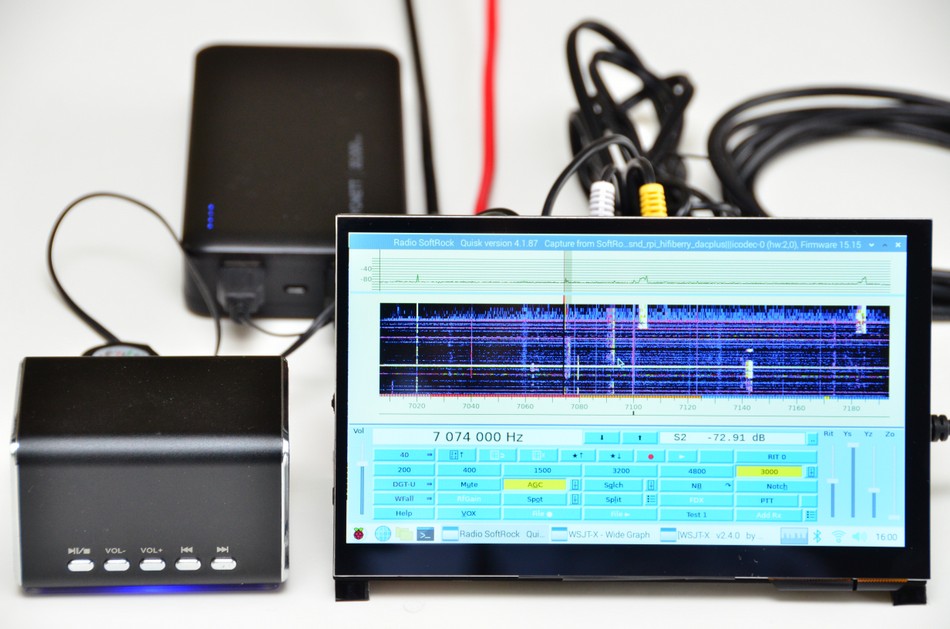
SDR Transceiver Prototype (Front)
Wiring:
- The prototype is powered by a USB battery pack. The final design will include a 12-5V DC/DC Converter.
- The prototype uses an amplified speaker. The final design will include a speaker amplifier and external speaker.
- The prototype uses standard audio cables. The final design will use a cable loom.
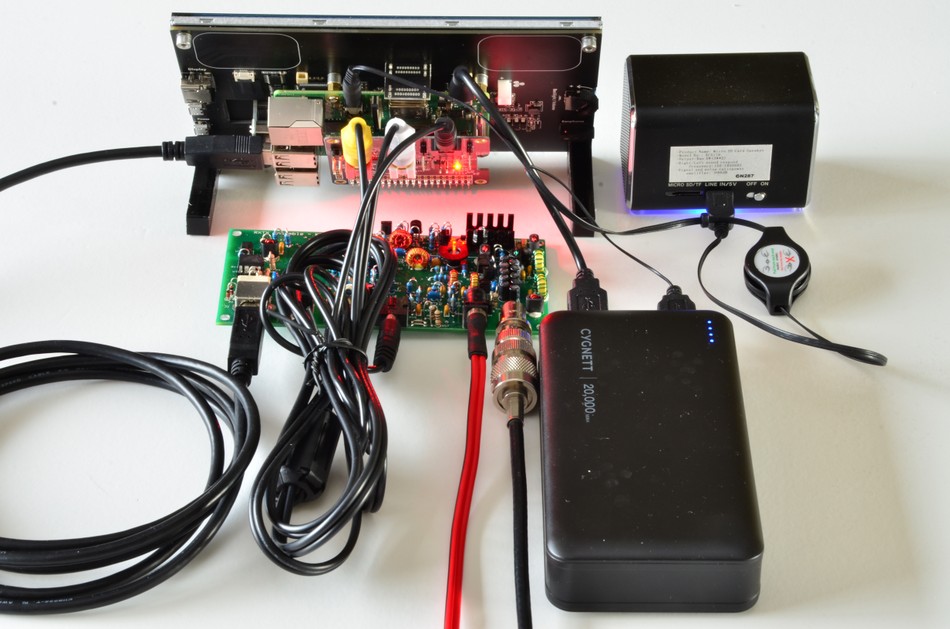
SDR Transceiver Prototype (Rear)
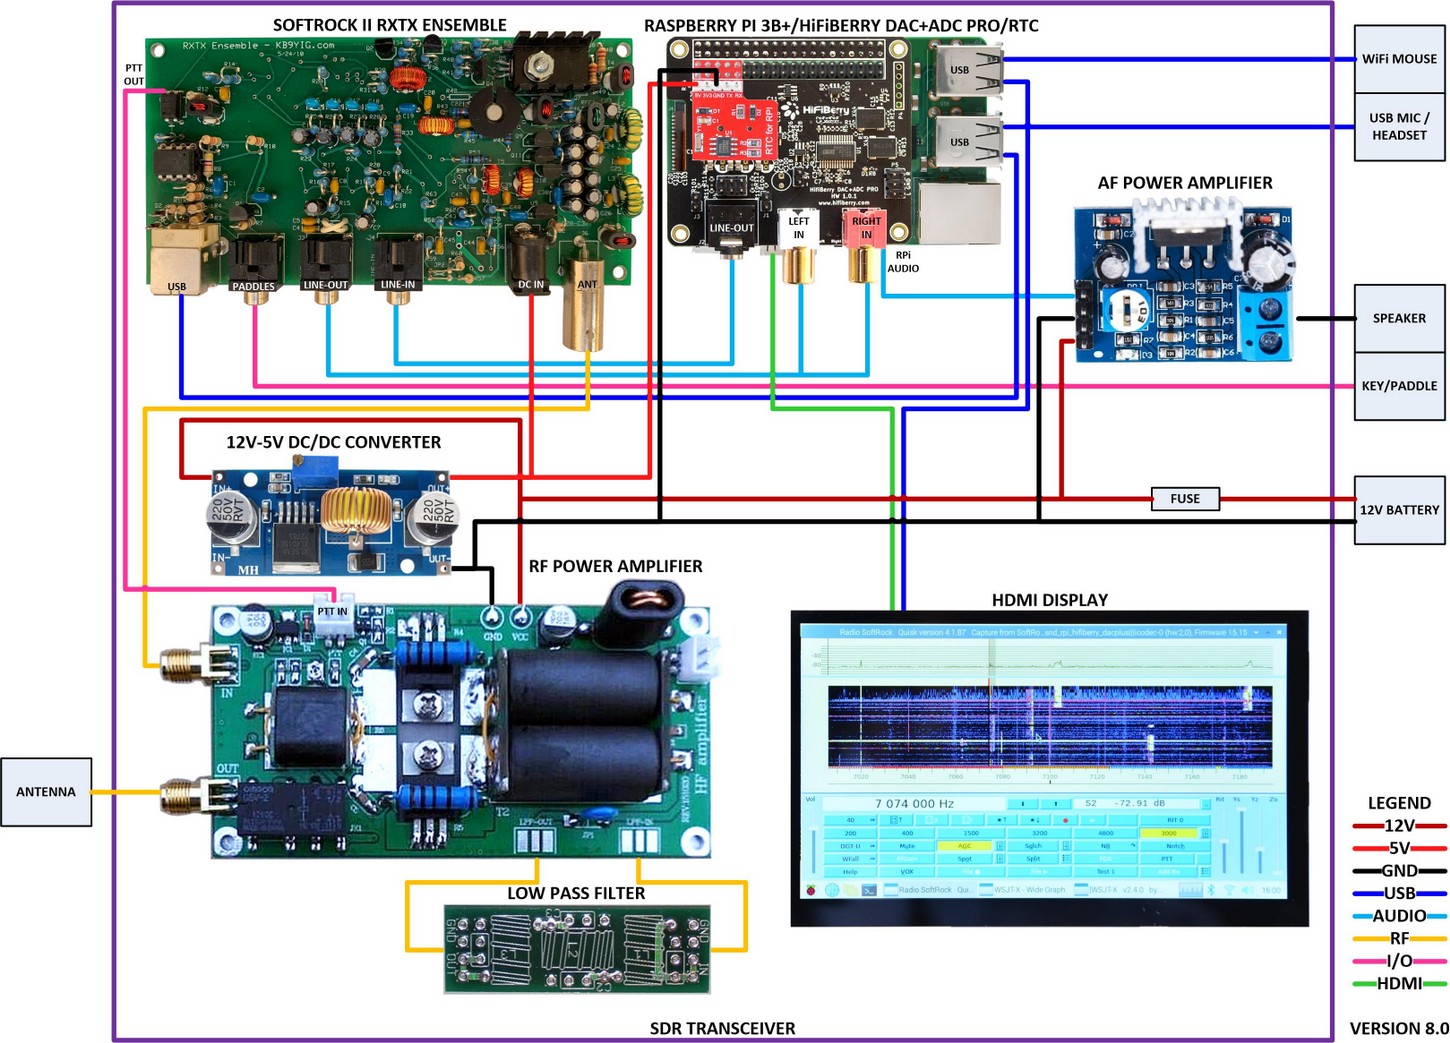
SDR Transceiver Pictorial Schematic Diagram
Quisk Display:
- To start Quisk: Select Main Menu | HamRadio | Quisk; or click on the headset icon in the Launch Application Bar
- The Quisk display is the small-format Quisk display
- Additional options appear for buttons shown with the => symbol
- All displays are maximized to fit the screen
- The Menu Bar is used to select between displays
- The Terminal window can be used with an on-screen keyboard for text entry
- The capacitive touch screen works well with a stylus
- A wireless mouse is easier as the wheel can be used to tune frequencies
Notes:
- Quisk is open-source and was originally written by James Ahlstrom, N2ADR.
- Many others contributed to Quisk, and are mentioned in comments in the source code.
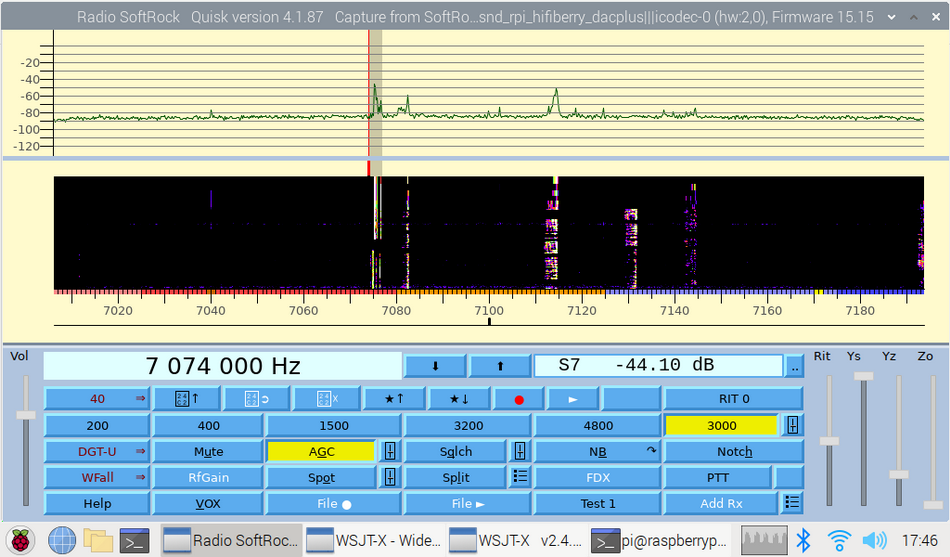
Quisk Display
WSJT-X Display:
- To start WSJT-X: Select Main Menu | HamRadio | WSJT-X; or click on the WSJT-X icon in the Launch Application Bar
- The WSJT-X display is maximized
- For more information please refer to the WSJT-X user guide
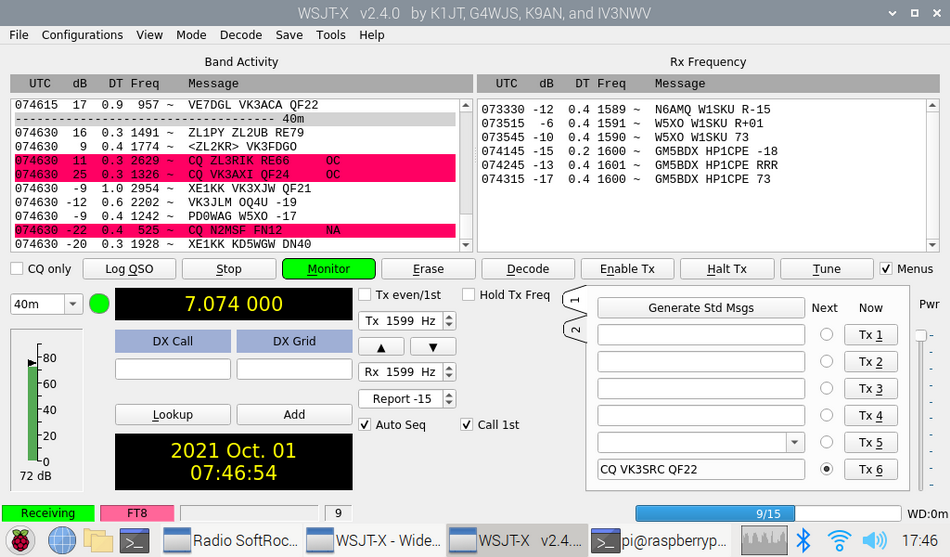
WSJT-X Display
WSJT-X Wide Graph Display:
To start WSJT-X: Select Main Menu | HamRadio | WSJT-X; or click on the WSJT-X icon in the Launch Application Bar
The WSJT-X Wide Graph display is maximized
Set Bins/Pixel 4 to see a 3kHz wide waterfall
Set N Avg 1 to see a fast-moving waterfall
Set Start 200Hz to ignore the first 200Hz of the display, where the soundcard performance is not guaranteed
Set Spec 15% to reduce the size of the spectrum display
For more information please refer to the WSJT-X user guide
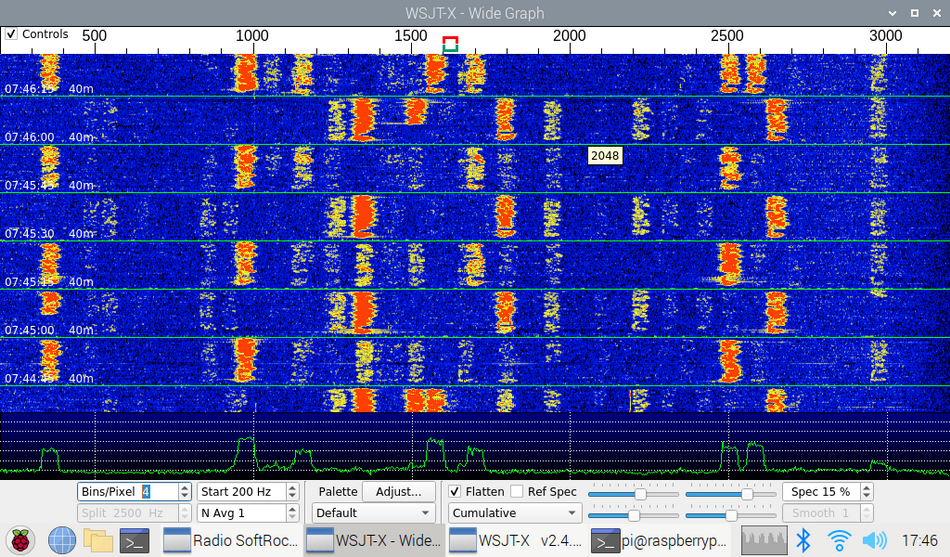
WSJT-X Wide Graph Display
Softrock RXTX Ensemble
- The transceiver is controlled by an Attiny85 microcontroller, programmed as a USB device.
- The local oscillator is a Si570, which works at 4-times the operating frequency. The output is divided to provide two quadrature-phase signals.
- The receiver has a bandpass filter, quadrature detector and I & Q baseband amplifiers
- The transmitter has I & Q baseband amplifiers, a quadrature encoder and bandpass filters
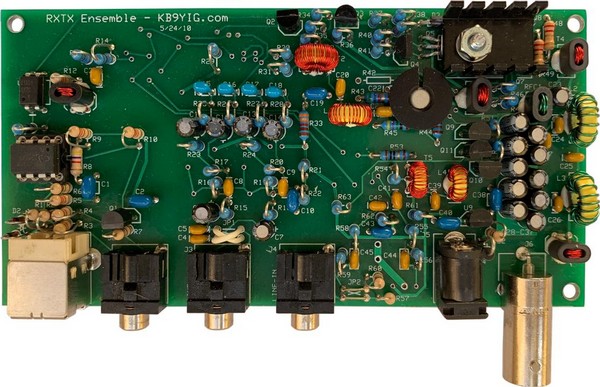
Softrock RXTX Ensemble
Raspberry Pi 3B+
- Broadcom BCM2837B0, Cortex-A53 (ARMv8) 64-bit SoC @ 1.4GHz
- 1GB LPDDR2 SDRAM
- 2.4GHz and 5GHz IEEE 802.11.b/g/n/ac wireless LAN, Bluetooth 4.2, BLE
- Gigabit Ethernet over USB 2.0 (maximum throughput 300 Mbps)
- Extended 40-pin GPIO header
- Full-size HDMI
- 4 USB 2.0 ports
- CSI camera port for connecting a Raspberry Pi camera
- DSI display port for connecting a Raspberry Pi touchscreen display
- 4-pole stereo output and composite video port
- Micro SD port for loading your operating system and storing data
- 5V/2.5A DC power input
- Power-over-Ethernet (PoE) support (requires separate PoE HAT)
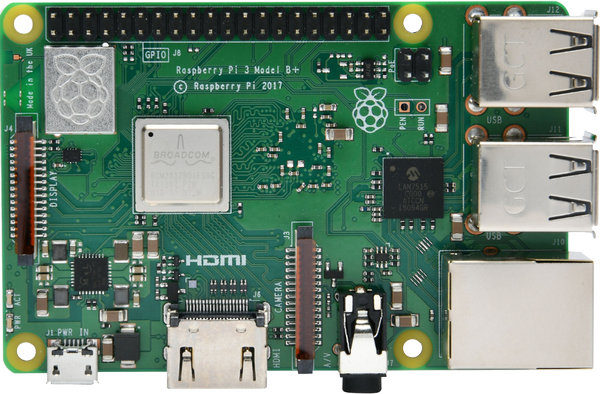
Raspberry Pi 3B+
HiFiBerry DAC+ ADC Pro
- Maximum input voltage: 2.1Vrms 4.2Vrms for balanced input
- Maximum output voltage: 2.1Vrms
- ADC signal-to-noise ratio: 110db typical
- DAC signal-to-noise ratio: 112db typical
- ADC THD+N: -90db typical
- DAC THD+N: -93db typical
- Frequency response: 10Hz-70kHz (-3dB)
- Input gain: -12db to 32dB
- Power consumption: <0.3W
- Sample rates: 44.1-192kHz
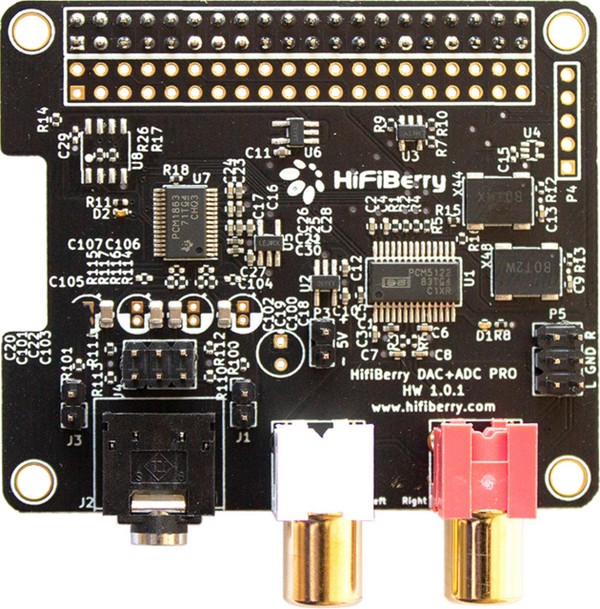
HiFiBerry DAC+ ADC Pro
12V - 5V DC/DC Converter
- Module Properties: Non-isolated step-down (buck) module
- Rectification: Non-synchronous rectifier
- Input voltage: DC 5V-30V
- Output voltage: DC 0.8V-24V (Adjustable, Output < Input)
- Output current: 2.5A. (5A with heatsink)
- Conversion efficiency: 90%(highest)
- Switching Frequency: 300KHz
- Output ripple: 30mV(maximum)
- Load regulation: ±0.5%
- Voltage regulation: ±2.5%
- Operating Temperature: -40℃ ~ +85℃
- 43mm*21mm*14mm(L*W*H)/1.69'' * 0.83'' * 0.55'' approx
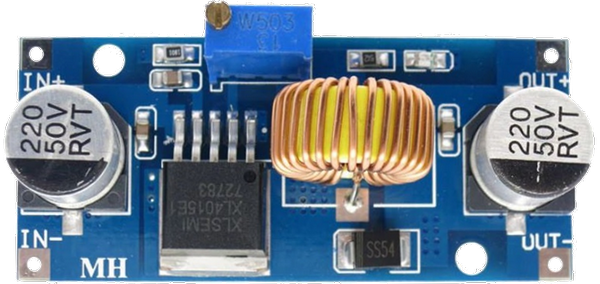
12V - 5V DC/DC Converter
Raspberry Pi Real Time Clock
- Maxim DS1307 chip
- CR1220 button cell power backup
- Can be operated with shell command
- Includes a serial port connector
- Programmable square-wave output signal
- Consumes Less than 500nA in Battery-Backup Mode
- Automatic Power-Fail Detect and Switch Circuitry
- Pin Header is used to supply 5V to the Raspberry Pi / HDMI Display
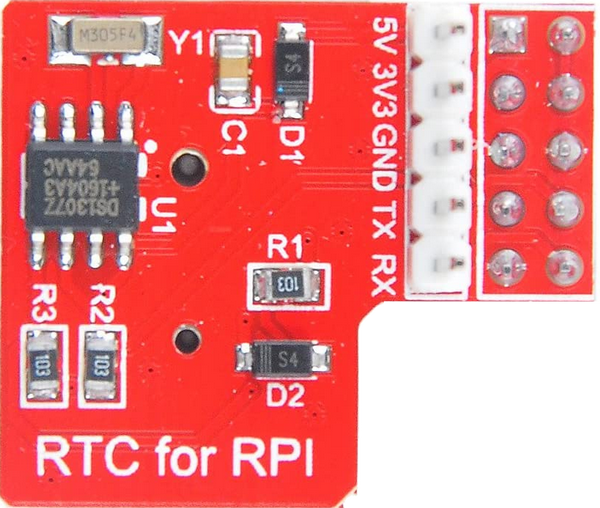
Raspberry Pi Real Time Clock
HDMI Display
- Screen Type: IPS Screen
- Screen Size: 7.0 inch
- Resolution: 1024x600
- Backlight Adjustment: Independent Button To Turn On
- Touch Screen Type: Capacitive
- Touch IC: GT911
- Power Supply: Micro USB (5V / 2A)
- Video Input Interface: HDMI-Compatible
- Audio Output Interface: 3.5mm Audio Interface + 2 Speakers (8Ω2W)
- Size: 164.9 X 102mm/6.49 X 4.02"
- Note: The two HDMI speakers and the touch screen are not used
HDMI Display
RF Power Amplifier
- Power supply voltage: 13.8V
- Power supply current: 6-10A
- Maximum input power: 5W
- Maximum output power: 70W
- Frequency range 3.5--30Mhz (10M - 80M)
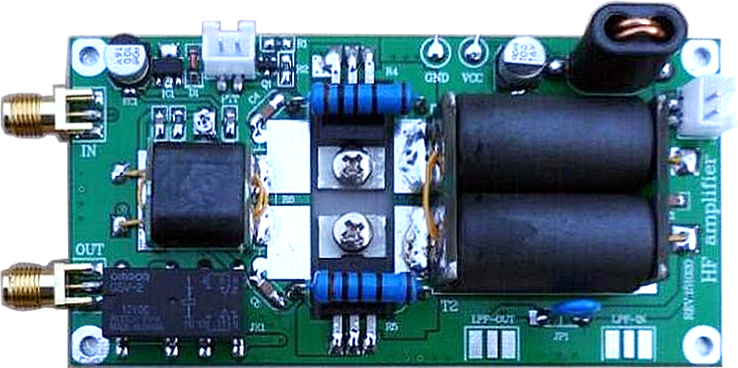
RF Power Amplifier
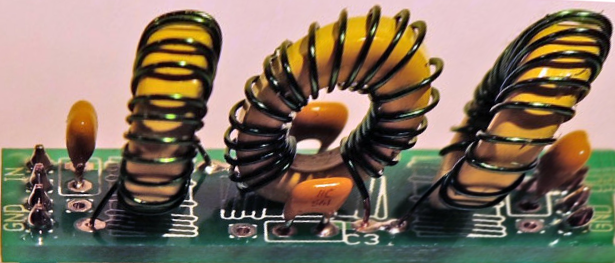
Low Pass Filter
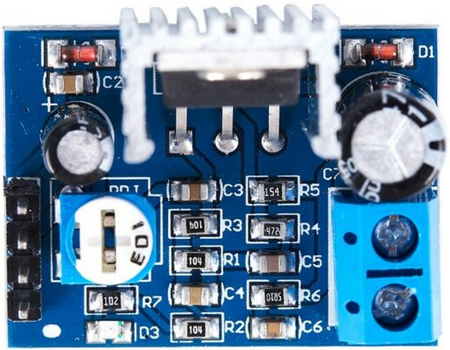
TDA 2030A AF Power Amplifier Module (Top)
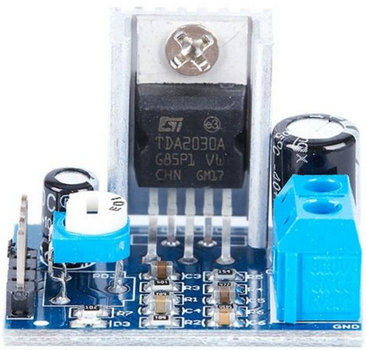
TDA 2030A AF Power Amplifier Module (Front)
Low Pass Filter:
- Single band LPF
- Increase capacitor voltage for higher power
AF Power Amplifier:
- TDA2030A 18W audio power amplifier chip
- Onboard volume control
- Onboard power indicator
- Working voltage: 6 ~ 12VDC
- Board size: 31.6mm x 23.2mm
Software Setup Procedure (Note: This is still in development):
This procedure is only for the hardware configuration as shown in the pictorial schematicThis procedure involves setting up and configuring the following software. These instructions were compiled from the following links:
- Raspberry Pi OS
- wxPython
- Quisk
- WSJT-X
- FLDIGI
- The Main Menu and Application Launch Bar
Notes:
- Always use the latest instructions and software form the sources above.
- Some filenames, which might need to be changed in the future, are highlighted.
Connect at the following hardware components:
- RPi temporarily connected to:
- USB powered hub connected to:
- USB Keyboard; and
- USB Headset
- RPi connected to:
- HDMI Touchscreen Display (via HDMI and USB joiners);
- HiFiBerry (via 40-Pin Header);
- Real Time Clock (via 40-Pin Header) connected to:
- 12V - 5V DC/DC Converter connected to:
- 12V Power Supply
- USB Mouse (dongle); and
- Softrock RXTX Ensemble connected to:
- 12V Power Supply;
- HiFiBerry (via 3.5mm Audio Cables); and
- HF Antenna
Create a Raspberry Pi OS Micro SDHC Card using the Raspberri Pi Imager:
Boot up the RPi and follow the prompts to configure it.
Set up your:CountryLanguageTimezonePassword (Important)ScreenWiFi Network SSID and PasswordSoftware Update
Set up Raspberry Pi PreferencesPress Restart
- You may need to select a dfferent keyboard layout using Preferences | Raspberry Pi Configuration | Localization | Set Keyboard.
- You may wish to reposition the task bar to the bottom of the screen. Select: Task Bar | Panel Settings | Geometry
- Enable I2C for the RTC: Select: Preferences | Raspberry Pi Configuration | Interfaces | I2C Enabled
- Note: The high-resolution mode of the HDMI Display has trouble displaying the desktop wallpaper image - it flickers. You may like to change it to a simple background colour (e.g. teal) instead.
Some of the following items are confured via a terminal window. We suggest that you open the Chrome browser on the Raspberry Pi and browse to this page: https://www.sarcnet.org/sdr-transceiver.html. You can then copy and paste the text from this page directly into the terminal window!
Setup the boot configuration for the HDMI display and the HiFiBerry sound card:
Make changes only in the following areas using the nano text editor. Then press ^O to save and ^X to exit.sudo nano /boot/config.txt
# uncomment to force a specific HDMI mode (this will force VGA)hdmi_cvt=1024 600 60 1 0 0 0hdmi_group=2hdmi_mode=87# uncomment to force a HDMI mode rather than DVI. This can make audio work inhdmi_drive=1# DMT (computer monitor) modes
[pi4]
# Enable DRM VC4 V3D driver on top of the dispmanx display stack
#dtoverlay=vc4-fkms-v3d
#max_framebuffers=2
[all]
#dtoverlay=vc4-fkms-v3d
dtoverlay=i2c-rtc,ds1307dtoverlay=hifiberry-dacplusadcpro
Reboot
sudo reboot
Set up the DS1307 Real Time Clock
sudo apt-get -y remove fake-hwclocksudo update-rc.d -f fake-hwclock removesudo systemctl disable fake-hwclock
sudo nano /lib/udev/hwclock-set
Comment out the following lines:
if [ -e /run/systemd/system ] ; thenexit 0fi
/sbin/hwclock --rtc=$dev --systz --badyear/sbin/hwclock --rtc=$dev --systz
Set the RTC time
sudo hwclock -w
Download wxPython -
Click on the following link.
Download the latest version of the wxPython source distribution (in this case it was wxPython-4.1.1.tar.gz)
Unzip wxPython:
tar xf ~/Downloads/wxPython-4.1.1.tar.gz
Install wxPython dependencies:
sudo apt-get -y install dpkg-dev build-essential libjpeg-dev libtiff-dev libsdl1.2-dev libgstreamer-plugins-base0.10-dev libnotify-dev freeglut3 freeglut3-dev libwebkitgtk-dev libghc-gtk3-dev libwxgtk3.0-gtk3-dev
Disable the Desktop
Note: This frees up resources for building wxPython. It is much faster and does not freeze.
sudo raspi-config nonint do_boot_behaviour B2
sudo reboot
Build wxPython:
python3 ~/wxPython-4.1.1/build.py build bdist_wheel
Note: This step will take several hours (~2.5 on a RPi 3B+). To recover from any lockups - Just cycle the power and run it again. It will start up where it left off. However, if you want to redo this step from scratch, run "python3 ~/wxPython-4.1.1/build.py cleanall bdist_wheel" and start again from "Unzip wxPython" above.
Enable the Desktop
sudo raspi-config nonint do_boot_behaviour B4sudo rebootNote: Repoen this web page to continue
Install wxPython into Python3:
sudo pip3 install ~/wxPython-4.1.1/dist/wxPython-4.1.1-cp37-cp37m-linux_armv7l.whl
Check wxPython is installed:
sudo python3 ~/wxPython-4.1.1/demo
Install Quisk dependencies:
sudo apt-get -y install fftw3-dev
Install quisk into Python3:
sudo pip3 install quisk
Add a new rule to give Quisk permission to access the Softrock USB port:
sudo nano /etc/udev/rules.d/local.rules
SUBSYSTEM=="usb", ATTR{idVendor}=="16c0" , ATTR{idProduct}=="05dc", MODE="0666", GROUP="dialout"
Note: Then run "sudo reboot" to reload the rules.
Install additional Main Menu categories such as HamRadio:
sudo apt-get -y install extra-xdg-menus
Create a Desktop Entry for Quisk:
sudo nano /usr/share/applications/quisk.desktop
[Desktop Entry]Comment=SDR TransceiverTerminal=falseName=QuiskExec=/usr/local/bin/quiskType=ApplicationIcon=/usr/share/icons/gnome/48x48/devices/audio-headset.pngStartupNotify=falseCategories=HamRadioHidden=false
Restart the Main Menu:
sudo lxpanelctl restart
Configure Quisk:
Note: To save configuration text changes always press Enter before closing the Config window.
Select Main Menu | HamRadio | Quisk
Select ConfigSelect RadiosAdd a new radio with the general type: SoftRock USB and name the new radio: SoftRockSelect AddWhen Quisk starts, use the radio: SoftRockSelect *SoftRock*Select Hardware:Use Si570 direct control: trueSelect Sound:Digital: 0.1Radio Sound: 48000 alsa:bcm2835 Headphones bcm2835 Headphones (hw:1,0)Microphone: 48000 0 0 pulse:Plantronics DA45 Analog Mono (hw:2,0)I/Q Rx Sample: 19200 0 1 alsa:snd_rpi_hifiberry_dacplusadcpro HiFiBerry DAC+ADC Pro HiFi multicodec-0 (hw:3,0)I/Q Tx Sample: 19200 0 1 alsa:snd_rpi_hifiberry_dacplusadcpro HiFiBerry DAC+ADC Pro HiFi multicodec-0 (hw:3,0)Note: For crossed-over I/Q lines on the SoftRock select:I/Q Rx Sample: 19200 1 0 alsa:...I/Q Tx Sample: 19200 1 0 alsa:...Digital Tx0: pulse Use name QuiskDigitalInputDigital Rx0: pulse Use name QuiskDigitalOutput.monitor
Select Options:S-meter correction: 14.0Select Windows:Startup: WFallWindow width: 1020Window height: 530Button: Small screen
Close and then reopen the Quisk Application. You should see signals on the waterfall and hear them on the speaker.
Calibrate the softrock frequency:
Select Main Menu | HamRadio | Quisk
Tune Quisk to a frequency reference signal e.g. 5MHz AMAdjust Zo for the maximum frequency resolution while still able to display the centre of the reference signalTune Quisk to the centre of the frequency reference signalNote the centre frequency, e.g. fc = 5001940HzSelect Config | *SoftRock* | Hardware:
Note the "Si570 crystal frequency", e.g. fx = 114285000
Press Enter, close and restart QuiskSet the "Si570 crystal frequency" to: fx - 25 x (fc - 5000000), e.g. 114236500Repeat the above process until the centre of the reference signal is at the reference frequencye.g. fx = 114236500, fc = 4999820, "Si570 crystal frequency" = 114241000
Increase the range of the softrock/soundcard anmplitude and phase correction:
Open ~/quisk_settings.json with a text editor
Change: "rx_max_amplitude_correct": "0.2" to: "rx_max_amplitude_correct": "0.4"Change: "rx_max_phase_correct": "10.0" to: "rx_max_phase_correct": "20.0"Save the file
Adjust the softrock/soundcard amplitude and phase correction:
Select Main Menu | HamRadio | Quisk
Select Config | Config:See this firstAdjust receive amplitude and phaseAdjust transmit amplitude and phase
Install WSJT-X:
Download the latest WSJT-X for Raspberry Pi ARMv6sudo dpkg -i ~/Downloads/wsjtx_2.5.4_amhf.debsudo apt --fix-broken install
Setup NTP for WSJT-X:
sudo timedatectl set-ntp true
Configure WSJT-X:
Select Main Menu | HamRadio | WSJT-X
Select File | Settings | General:Enter My Call and My GridSelect File | Settings | Radio:Rig: NonePTT Method: VOXNote: These can be changed later if HAMLIB is installedSelect File | Settings | Audio:Input: QuiskDigitalOutput.monitorOutput: QuiskDigitalInput
Install FLDIGI:
sudo apt-get -y install fldigisudo apt-get -y install pavucontrol
Configure FLDIGI:
Select Main Menu | Sound & Video | PulseAudio Volume Control
Select Playback: (TBD)Select Recording: (TBD)
Select Main Menu | HamRadio | FLDIGI
Follow the FLDIGI Configuration Wizard
Install Quisk, WXJT-X and FLDIGI shortcuts into the Application Launch Bar:
Right-click the Menu BarSelect Panel SettingsSelect Panel AppletsSelect Application Launch BarSelect PreferencesSelect HamRadio | QuiskPress AddSelect HamRadio | wsjtxPress AddSelect HamRadio | FLDIGIPress AddSelect Close
Install an on-screen keyboard:
sudo apt-get -y install matchbox-keyboard